Before & Aftercare Instruction
Jump to a service
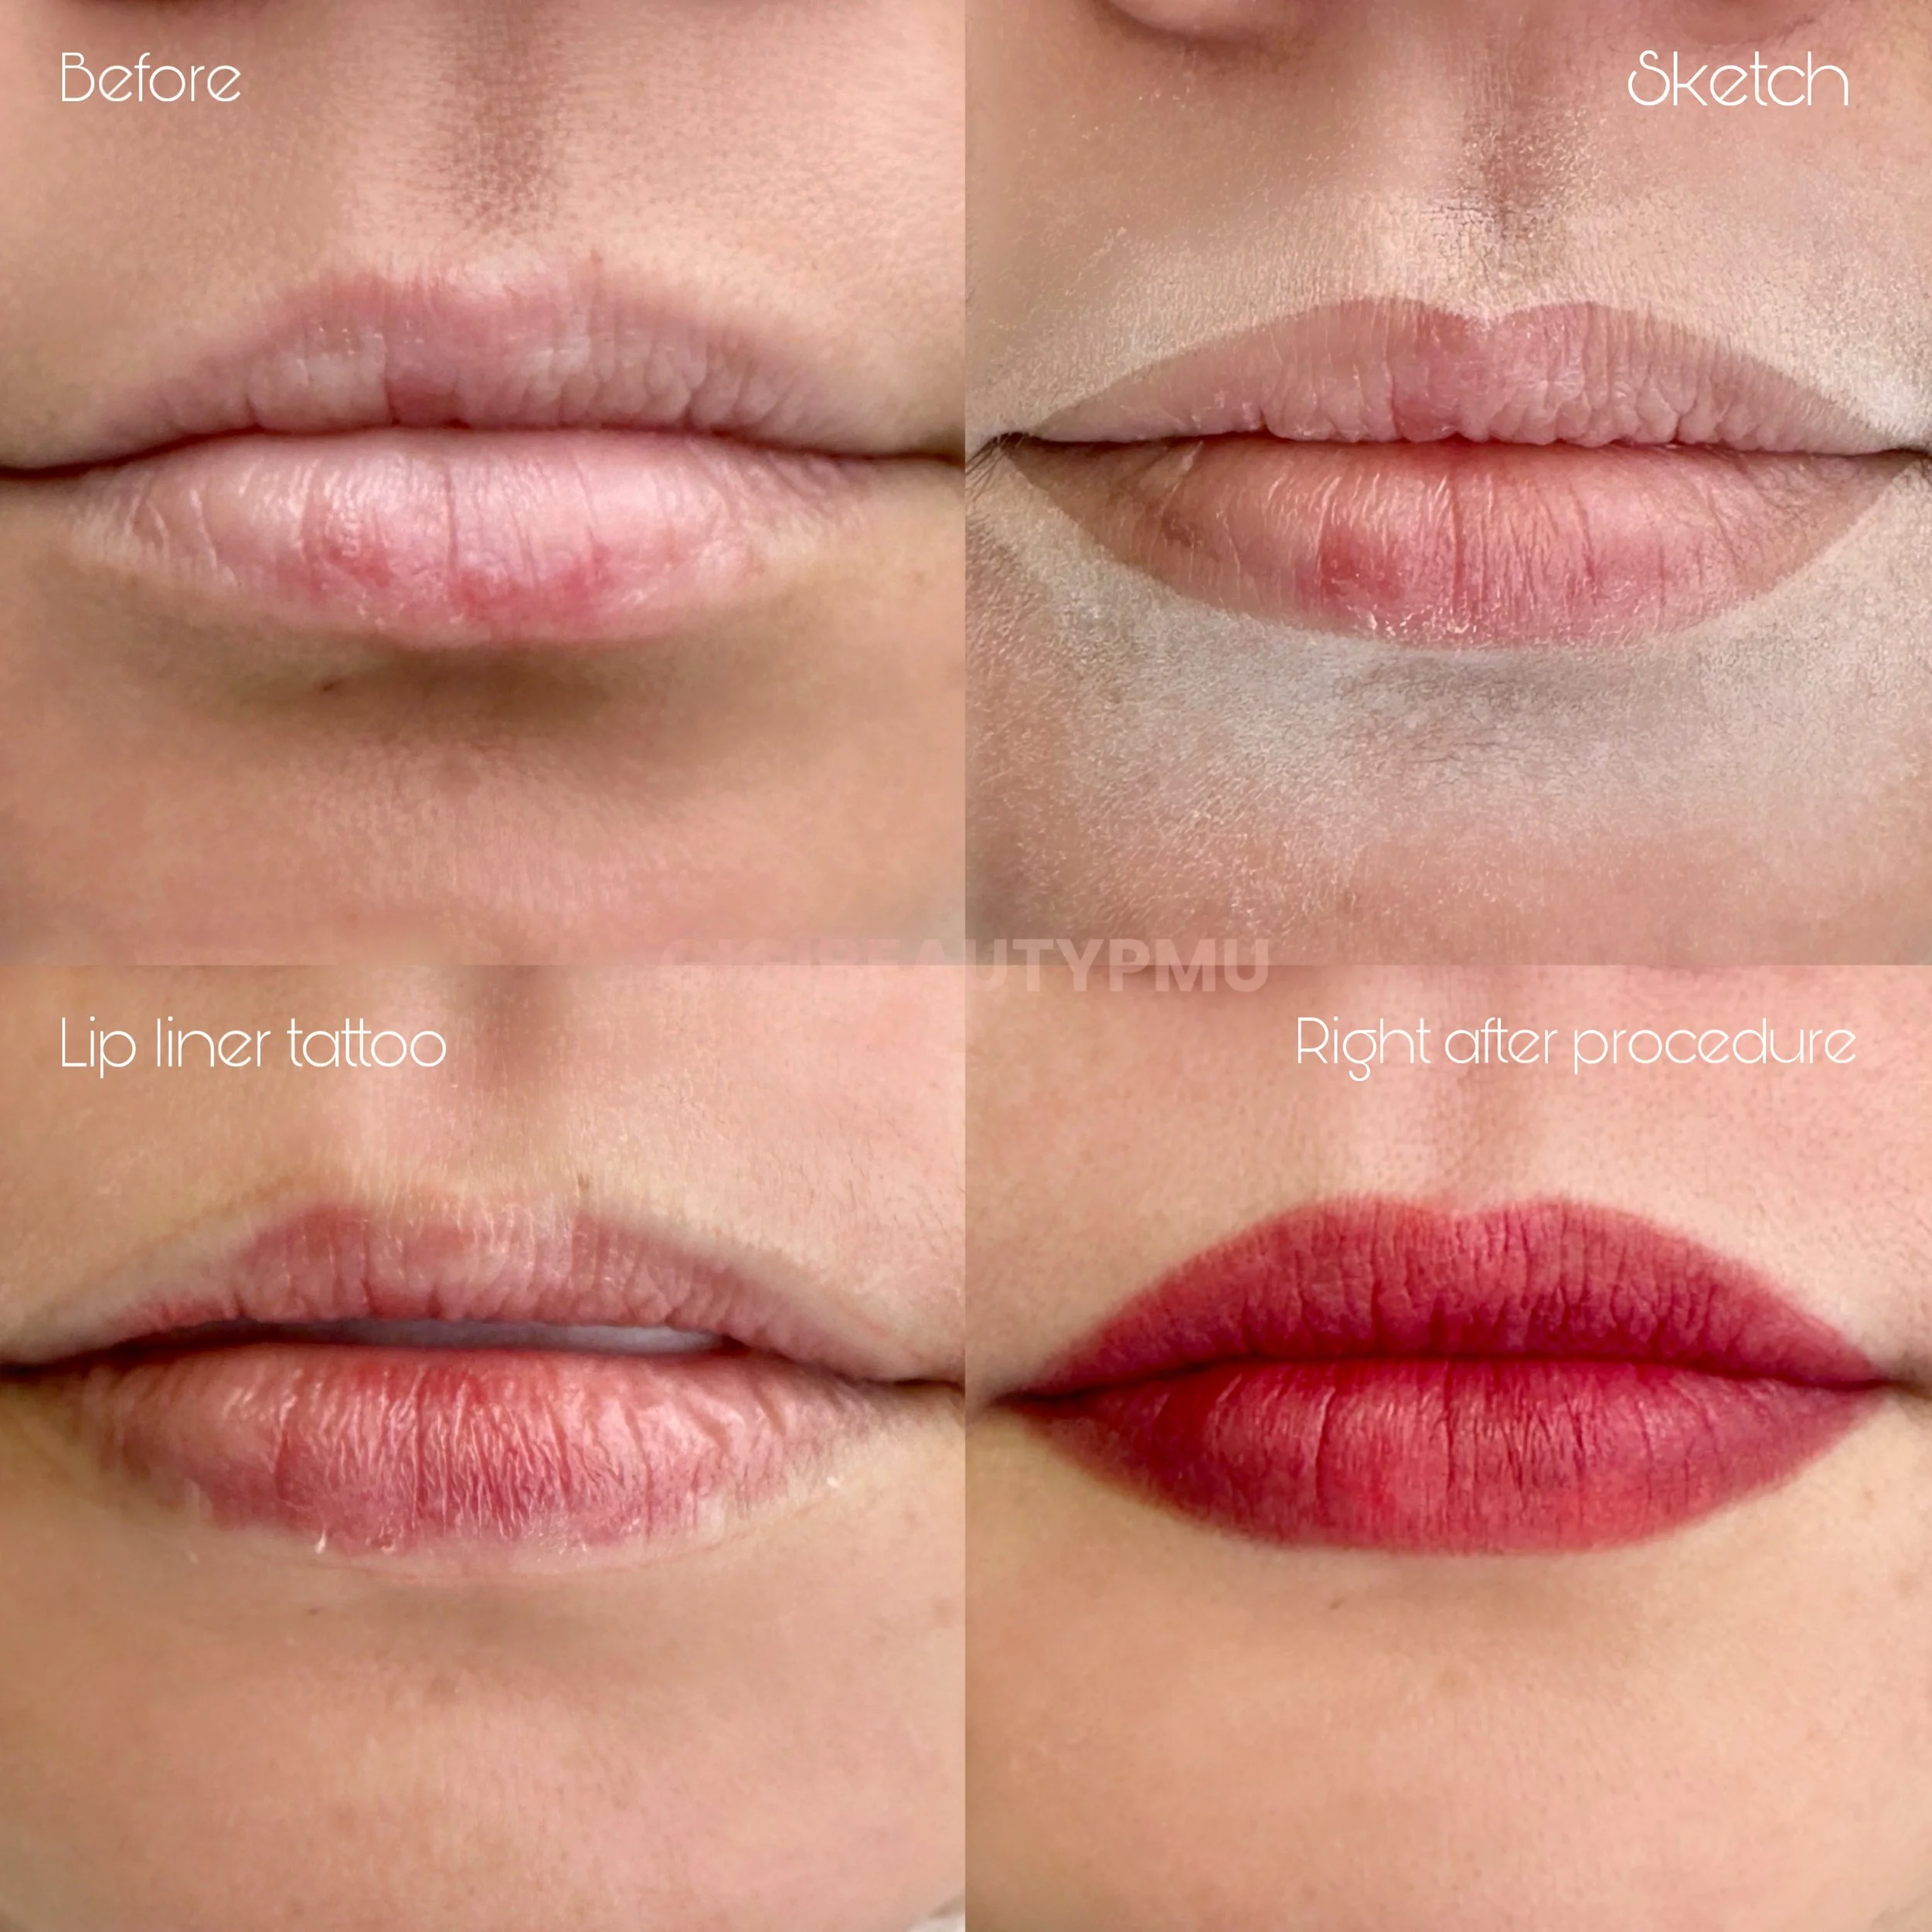
Lip Services
Before-care Instruction

If you have ever had cold sores (only affecting the lip area) or if you're unsure, we highly recommend you to contact your therapist before the procedure. Your physician prescribe you with Zovirax, Valtrex 3-5 days or L-Lysine 1000mg 3-5 days prior to your appointment or get medication from your doctors 3-5 days prior and 3 days after the procedure and repeat on all visits. Lysine vitamins and Abreva cream also help to treat herpes without doctor's prescription (we do not require a prescription, but we recommend you to consult a specialist about the correct use).
Please scrub and moisturize your lips a week before your permanent makeup procedure. Dry and chapped lips will prevent you from achieving the desired result.
Avoid ALCOHOL or CAFFEINE 24hrs prior to your appointment. This will prevent any excess bleeding, oozing and minimizes swelling during the procedure. Hydrate with water.
Unless medically necessary, avoid taking blood-thinning substances such as fish oils, herbals, Vitamin E, aspirin, ibuprofen, and do not donate plasma within 7 days before the procedure. Please consult your doctor if necessary.
If you are very sensitive to pain, take Tylenol 30 minutes before your procedure.
Make sure you have no contraindications. You can sign up for lip permanent makeup the month after fillers injection.


After-care Instruction
Day 1: Keep the treated area dry, clean & free from food for 24 hours following the procedure and gently cleanse the treated area using clean water & cotton pads.
Hot liquids, like coffee or tea, should be avoided for the first 24 hours after the procedure. Drinking through a straw can help minimize moisture on the treated area in the first few days.
Minimize the use of toothpaste for 5-7 days (opt for gentle cleaning alternatives).
Day 2 -14: Clean your lips every 3-4 hours and apply a small amount ointment cream. Avoid picking, scratching, or rubbing the area to prevent scarring or pigment loss.
Avoid activities such as swimming, saunas, and hot tubs for at least 2 weeks. Avoid direct sunlight, as it can cause the pigment to fade or your lip will show some black pots because of melanin.
Refrain from applying makeup or skincare products to the treated area for at least one week.
If you experience itching, redness, or swelling, you can apply a cool compress to the area.
If blisters appear, stop using the ointment cream and switch to an anti-blister cream. Lysine vitamins and Abreva cream also help to treat herpes.
During the healing process, your lips may appear dry, flaky, or scabbed. This is a normal part of the healing process,
Remember that permanent makeup is a process, and it may take several weeks for the final results to be visible. Be patient, follow the aftercare instructions diligently, and enjoy your beautiful new eyebrows.


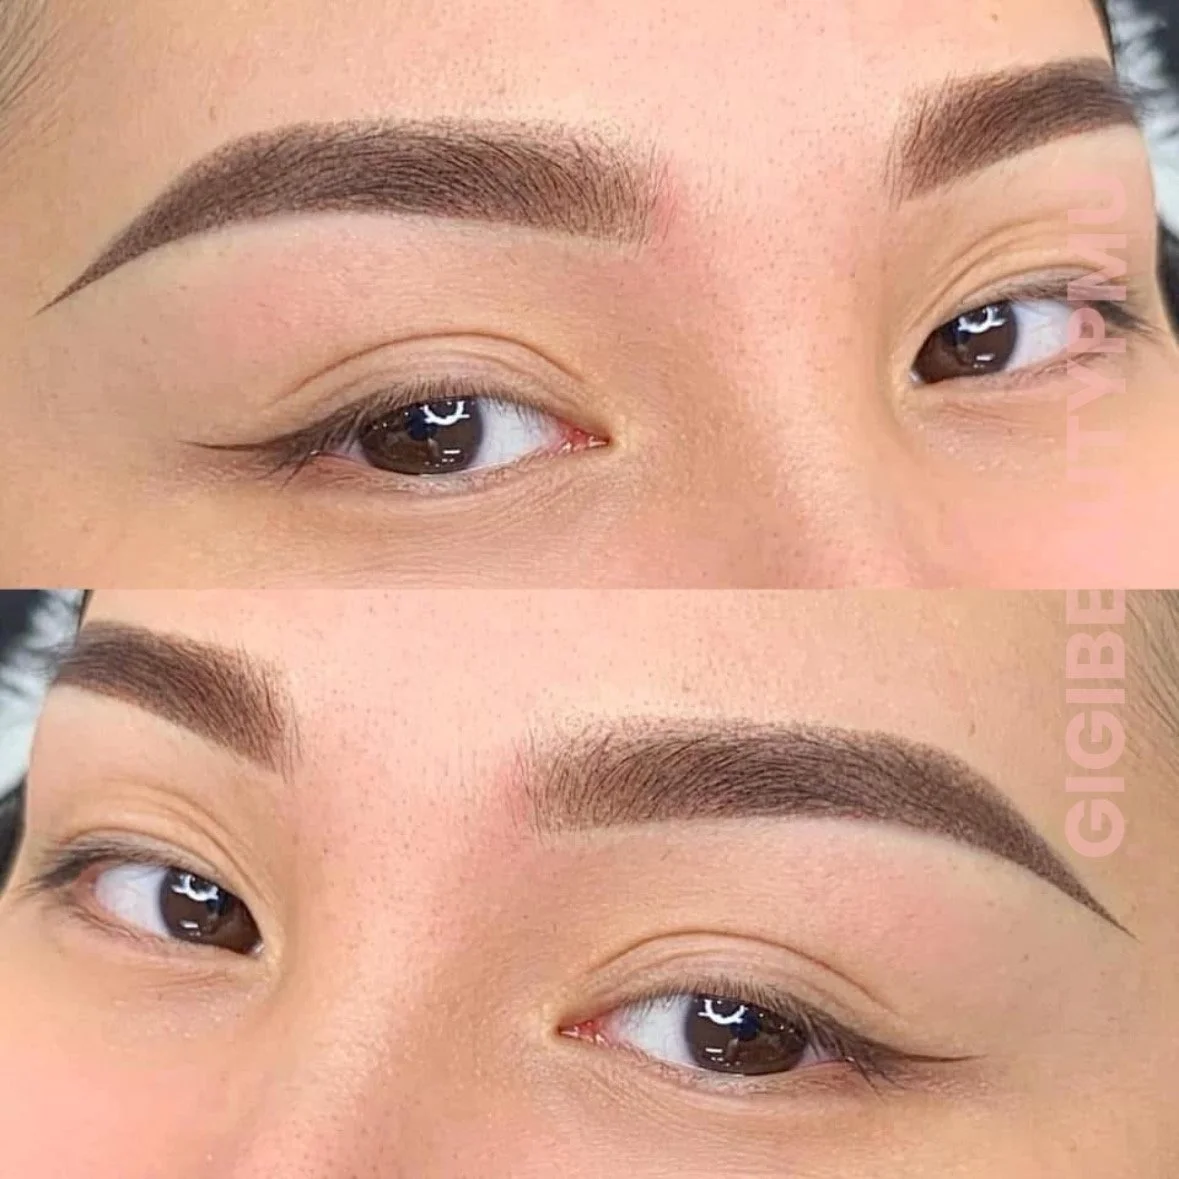
Eyebrow Services
Before-care Instruction
Avoid ALCOHOL or CAFFEINE 24hrs prior to your appointment. This will prevent any excess bleeding, oozing and minimizes swelling during the procedure. Hydrate with water..
Unless medically necessary, avoid taking blood-thinning substances such as fish oils, herbals, Vitamin E, aspirin, ibuprofen, and do not donate plasma within 7 days before the procedure. Please consult your doctor if necessary.
If you are very sensitive to pain, take Tylenol 30 minutes before your procedure.
Avoid sun and tanning bed 1-2 weeks prior to appointment
No facial or chemical peels 2 weeks prior to appointment.
Avoid waxing or tinting 1 week prior to appointment.
Make sure you have no contraindications.
Feel free wear your makeup if you choose to provide an idea of your desired color and shape. We provide thorough mapping and measurements to create the perfect brow shape for your face.


After-care Instruction
Day 1:
Day 2 -14:
Keep the treated area dry for 24 hours following the procedure.
Apply a small amount of aftercare ointment to the treated area twice a day, using a clean cotton swab. Avoid picking, scratching, or rubbing the area to prevent scarring or pigment loss.
Avoid activities such as swimming, saunas, and hot tubs for at least two weeks. Direct sunlight should also be avoided, as it can cause the pigment to fade.
Refrain from applying makeup or skincare products to the treated area for at least one week. When you do resume using these products, be gentle and avoid rubbing the treated area.
If you experience itching, redness, or swelling, you can apply a cool compress to the area.
Remember that permanent makeup is a process, and it may take several weeks for the final results to be visible. Be patient, follow the aftercare instructions diligently, and enjoy your beautiful new eyebrows.
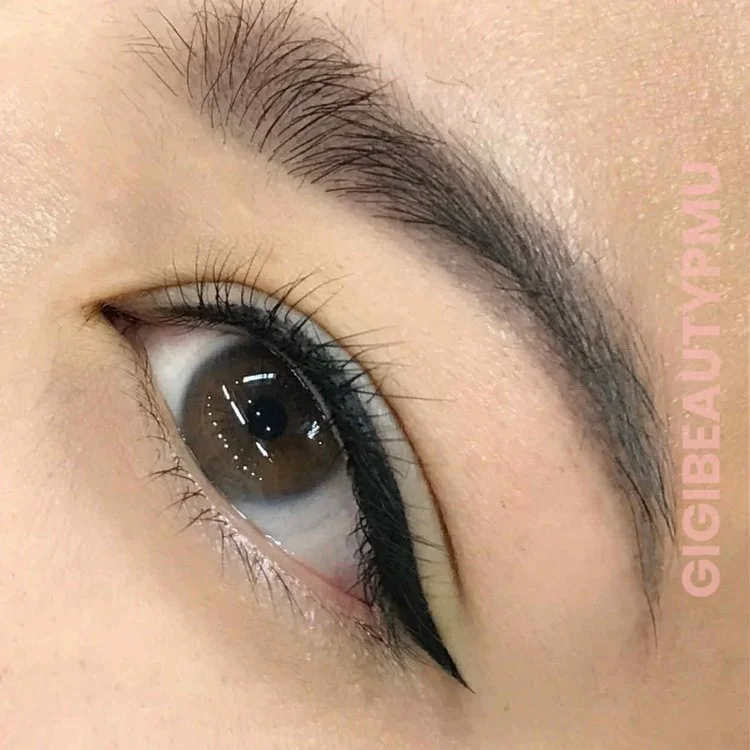
Eyeliner Services
Before-care Instruction
Please ensure that you arrive at your appointment without any eye makeup or cosmetics, including lash extensions.
Avoid lash lift 1 week prior to appointment.
Avoid ALCOHOL or CAFFEINE 24hrs prior to your appointment. This will prevent any excess bleeding, oozing and minimizes swelling during the procedure. Hydrate with water..
Unless medically necessary, avoid taking blood-thinning substances such as fish oils, herbals, Vitamin E, aspirin, ibuprofen, and do not donate plasma within 7 days before the procedure. Please consult your doctor if necessary.
If you are very sensitive to pain, take Tylenol 30 minutes before your procedure.
Avoid sun and tanning bed 1-2 weeks prior to appointment
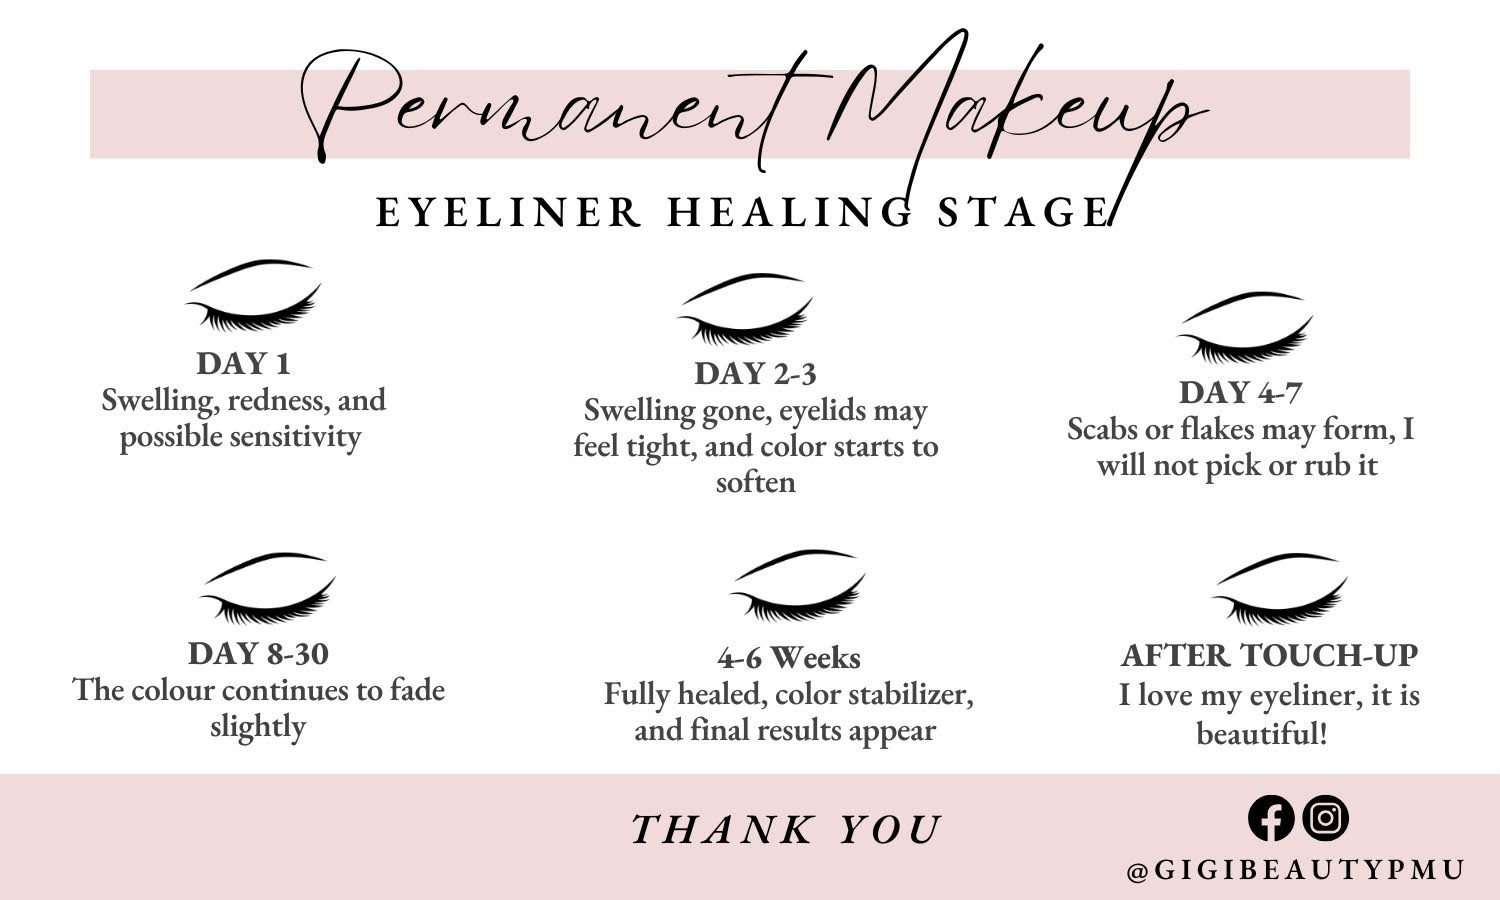
After-care Instruction
Day 1:
Keep the treated area dry for 24 hours following the procedure.
Day 2 -14:
Apply a small amount of aftercare ointment to the treated area twice a day, using a clean cotton swab. Avoid picking, scratching, or rubbing the area to prevent scarring or pigment loss.
Avoid activities such as swimming, saunas, and hot tubs for at least two weeks. Direct sunlight should also be avoided, as it can cause the pigment to fade.
Refrain from applying makeup or skincare products to the treated area for at least one week. When you do resume using these products, be gentle and avoid rubbing the treated area.
If you experience itching, redness, or swelling, you can apply a cool compress to the area.
Days 15+:
Remember that permanent makeup is a process, and it may take several weeks for the final results to be visible. Be patient, follow the aftercare instructions diligently, and enjoy your beautiful new eyeliner.
Make sure you have no contraindications.
Feel free wear your makeup if you choose to provide an idea of your desired color and shape. We provide thorough mapping and measurements to create the perfect eyeliner shape for your face.
After two weeks, it’s safe to enjoy your favorite eyelash extensions again

FAQs
-
Everyone has a different pain tolerance. We prioritize comfort by applying numbing several times during the procedure. Around 90% of my clients feel at ease and report no pain after the procedure.
-
Right after the procedure, your lip color will appear brighter than the shade you originally selected. This is completely normal. As your lips and brows heal over the next week, the color will fade by about 40%-50%. The initial brightness is essential to ensure a long-lasting result that clients can enjoy.
-
If you have a history of cold sores, there’s always a possibility of experiencing another outbreak. We recommend consulting with a medical professional prior to the procedure. Your doctor may prescribe Zovirax/Aciclovir, lysine supplements, or Abreva cream (the latter two are available over-the-counter, but it’s best to check with your doctor for proper use).
-
Great question! Right after the procedure, permanent makeup appears more intense and vibrant.
However, after about a month, the color will soften, resulting in a more natural appearance.
The brightness will reduce by around 40-50% from its original intensity.
While some clients may be concerned about how bright it looks initially, it's important to keep in mind that if the color is too light at the start, there may not be noticeable results after two months.
-
Healing for lips after a permanent makeup procedure (like lip tattooing or lip blush) usually follows a general process:
Immediate Aftercare (First Few Days): Right after the procedure, your lips may be swollen, red, or tender. This is normal and should gradually subside. After the procedure 2 hours, this feeling will gone. The initial color may look darker and more intense.
Peeling and Flaking (Days 2-7): As your lips start to heal, you may notice some peeling or flaking of the skin. Don’t pick at it—let it fall off naturally. This is a sign that your lips are renewing themselves.
Healing (Week 1-2): The color might still appear a bit softer than what you saw immediately after the procedure.
Settling (Week 3-4): Around 3-4 weeks, the final color will begin to show. It may still be slightly lighter than when you first had the procedure, but it will look more natural.
Long-term Healing (1-2 Months): Full healing, including the settling of the color, can take up to two months. During this time, the color will soften. There are few uneven spots. There are few uneven spots. Time for touch up.
-
Absolutely! Permanent makeup and fillers complement each other beautifully. For the best results, it’s recommended to schedule your permanent makeup session 6 weeks before or after getting filler injections. This allows the filler to settle and ensures the permanent makeup heals properly. Timing the procedures right helps achieve balanced and long-lasting results